


.png)


How to log into your Sawyer account
First, set up your Sawyer account.
You may have already completed this step, and if so you can skip to the next section!
If you haven’t done this yet, check your inbox! You’ll get an email with the subject line “Complete Your Subscription” inviting you to accept access to your account and sign your agreement. This is where you’ll click Review & Subscribe to set up your subscription.
As soon as you complete this step, you’ll be able to access your full account and start the onboarding process! You’ll hear from us shortly after this, but in the meantime we encourage you to enter your banking and Stripe details here.

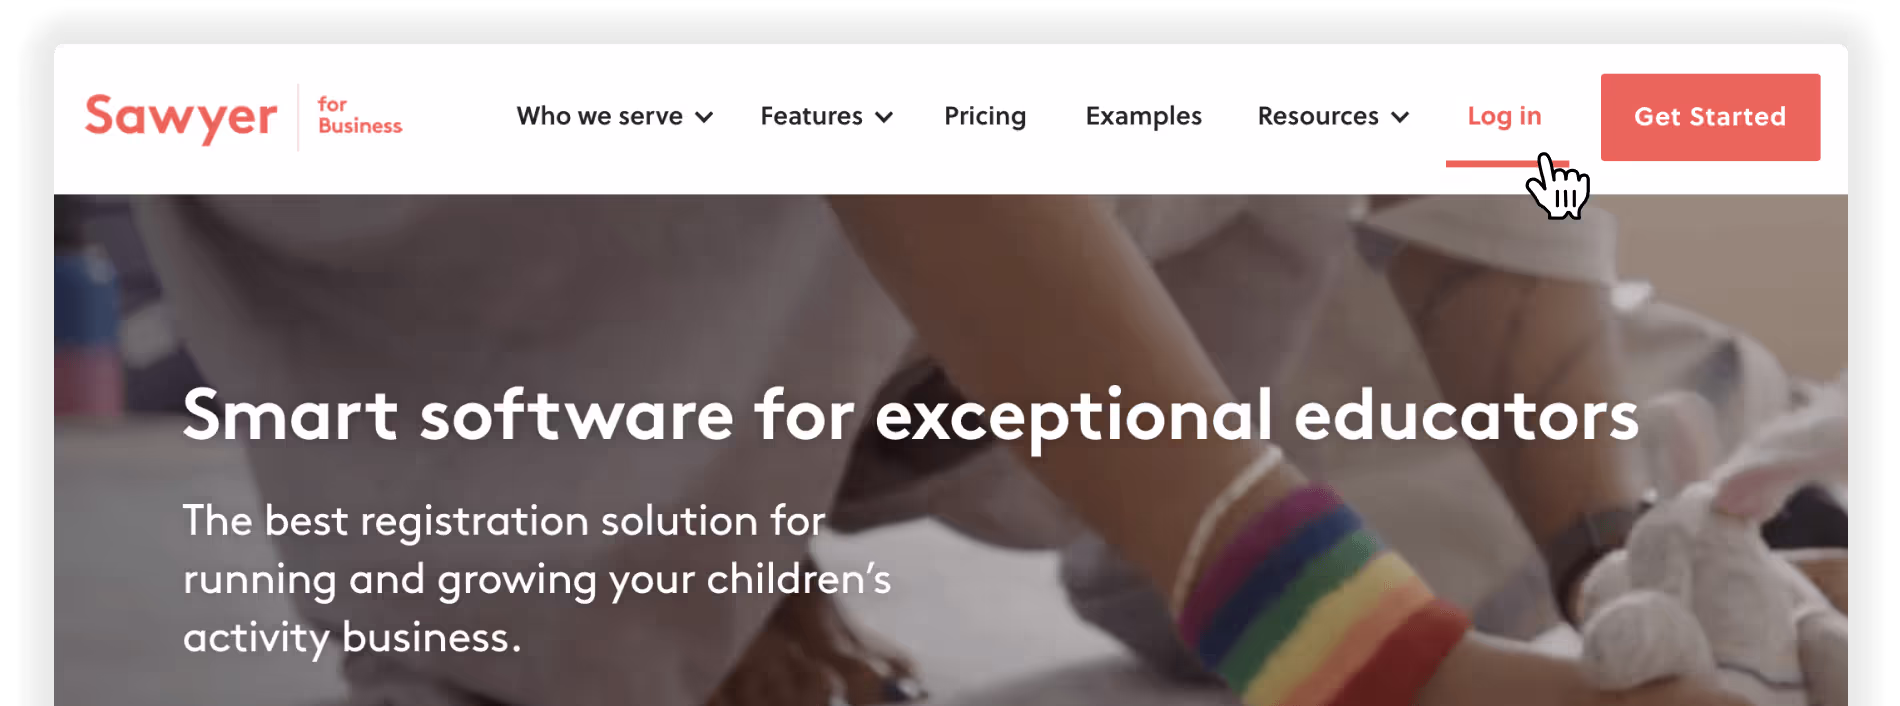
Log in from Hisawyer.com/for-business/
If you need to log in on a new device, go to hisawyer.com/for-business/ and click Log In in the top right navigation. Enter your email and password, or click forgot password to set up a new one.
Once you're logged in, we recommend bookmarking hisawyer.com/portal in your browser so you can access your account easily!
This is also a great time to make your account even more secure by setting up two-factor authentication.
If you are on our Marketplace and want to get to your Sawyer for Business portal, click the computer icon in the upper right corner of your screen. You’ll know you’re on our Marketplace when you see activities from other businesses we work with.
Review our Help Center article for more support on logging in.
Collaborative onboarding
Our Onboarding team is here to help set you up for success as you launch with Sawyer. Below is a detailed overview of the onboarding process, from setting up your subscription through launching registration!
1. Set up banking and subscription information
- Review your Sawyer subscription details and add or edit your payment method
- Set up your banking information by clicking Get Started, which will take you to the Stripe verification page. This information is needed by Stripe to verify your business. While we cannot make changes to the information that is requested by Stripe, we can do our best to help with any questions you may have.
- Once you’ve filled out all of your information, you’ll get a pop-up confirming that you’re all set and Stripe is verifying your information.
2. Schedule your implementation call
- Schedule your call with one of our onboarding specialists who will help you launch your registration. Be sure to check your email first in case your sales rep has already scheduled this call.
- *For Scale Tier Providers, please reach out to onboarding@hisawyer.com to schedule your Pre-Implementation call.
- We recommend scheduling your call between 1-2 weeks of your desired registration launch date.
3. Fill out your schedule template
- Your schedule template was emailed to you by your sales rep after your next steps call. If you can't find your template or have questions, let us know!
Pro tip: refer to our training videos for some useful context and examples when filling out your template.
4. Get ready for your implementation call
- Gather your list of questions.
- Decide how you want to launch your Sawyer registration—embed a widget or link to the registration pages. We’ll discuss your plan on the call to figure out the best course of action.
- Determine your launch date—most businesses will launch their registration on the day of their implementation call or a few days after.
5. Final touches (if needed): Post implementation call
- If edits are needed before launch, your onboarding specialist will show you how to make them. Otherwise, your specialist can make the edits for you. If you’re not sure where to make edits, refer to this article.
6. Launch registration
- This is when customers are able to start signing up for your programs through Sawyer! If you are opted into our Marketplace, you will be added once we have marked your account live on our end.
- For more details, see Launching Your Sawyer Registration for the First Time!
- Once you’re live, we’ll introduce you to our Customer Success team. They are the team to help with questions you may have as you start taking registrations and adding additional programs! They can be reached at support@hisawyer.com.
Sawyer payment processing
We use Stripe as our payment processor for all transactions. Stripe is a national and international leader in secure online payment processing for businesses and individuals.
The Sawyer platform is the main account with Stripe and all of our providers are considered connected accounts under the primary Sawyer account. Even though payments are processed through Stripe, you’ll use Sawyer to access all the information you need! You’ll find information on orders, bank transfers, disputes, and more right under your Financials tab.
Common questions
I already have a Stripe account, how do I connect it to Sawyer?
- Because of the way Sawyer integrates with Stripe, you're not able to connect a previous Stripe account to your Sawyer account. This also means that all the information you’re used to seeing in Stripe will be stored in your Sawyer account and you'll be able to view orders, payouts, reports, etc. along with client registration information all in one place!
Can I negotiate a rate with Stripe directly?
- At this time, Sawyer does not support connecting individual payment processors including an existing account with Stripe. For that reason, the credit card processing rates are standard across every business that works with us and we don’t currently support the ability to connect individual merchant Stripe accounts on Sawyer for different negotiated rates.
What is my business type?
- If you’re not sure of your business type, we recommend referring to this article in Stripe’s help center. If needed, we can have Stripe reset the business type at any point.
Why does Stripe ask these questions?
- During the initial account verification Stripe will gather information so that your account is secure and can properly process payments. While we are able to provide some light guidance, we cannot alter or remove any questions.
Moving existing registrants into Sawyer
If you’re signing on with Sawyer to launch registration for a new season of programs, you can rest assured that as customers sign up they will be immediately added to your Contacts! There’s no need to import them manually, and this means you’ll be getting their most up to date information.
If you are switching to Sawyer mid registration season, you may be wondering how to get those registered customers into the corresponding rosters.To determine the best way to move registrants into Sawyer, you’ll want to consider if the customers have already paid for these classes in full or not, what type the types of programs are and how you want to communicate the transition to them. Here are some options:
- Provide a 100% off coupon - this allows customers to re-register in Sawyer but waives the cost since they’ve already paid.
- Add the order internally - you can place the order on their behalf and add them to a specific activity roster.
- Quick add student - this can be used for quick scenarios that do not require payment or customers answering activity specific registration questions.
Please explore our Help Center for a full breakdown of different scenarios and next steps.
For providers on the Scale plan, we can import your contacts into Sawyer at no extra cost. Please review our Help Center article for more support on bulk importing contacts and next steps.
Making edits
There are key icons to look for when making edits: a pencil icon, three dot icon, or drop down. Browse the list below to find what you want to edit and where you can do so.
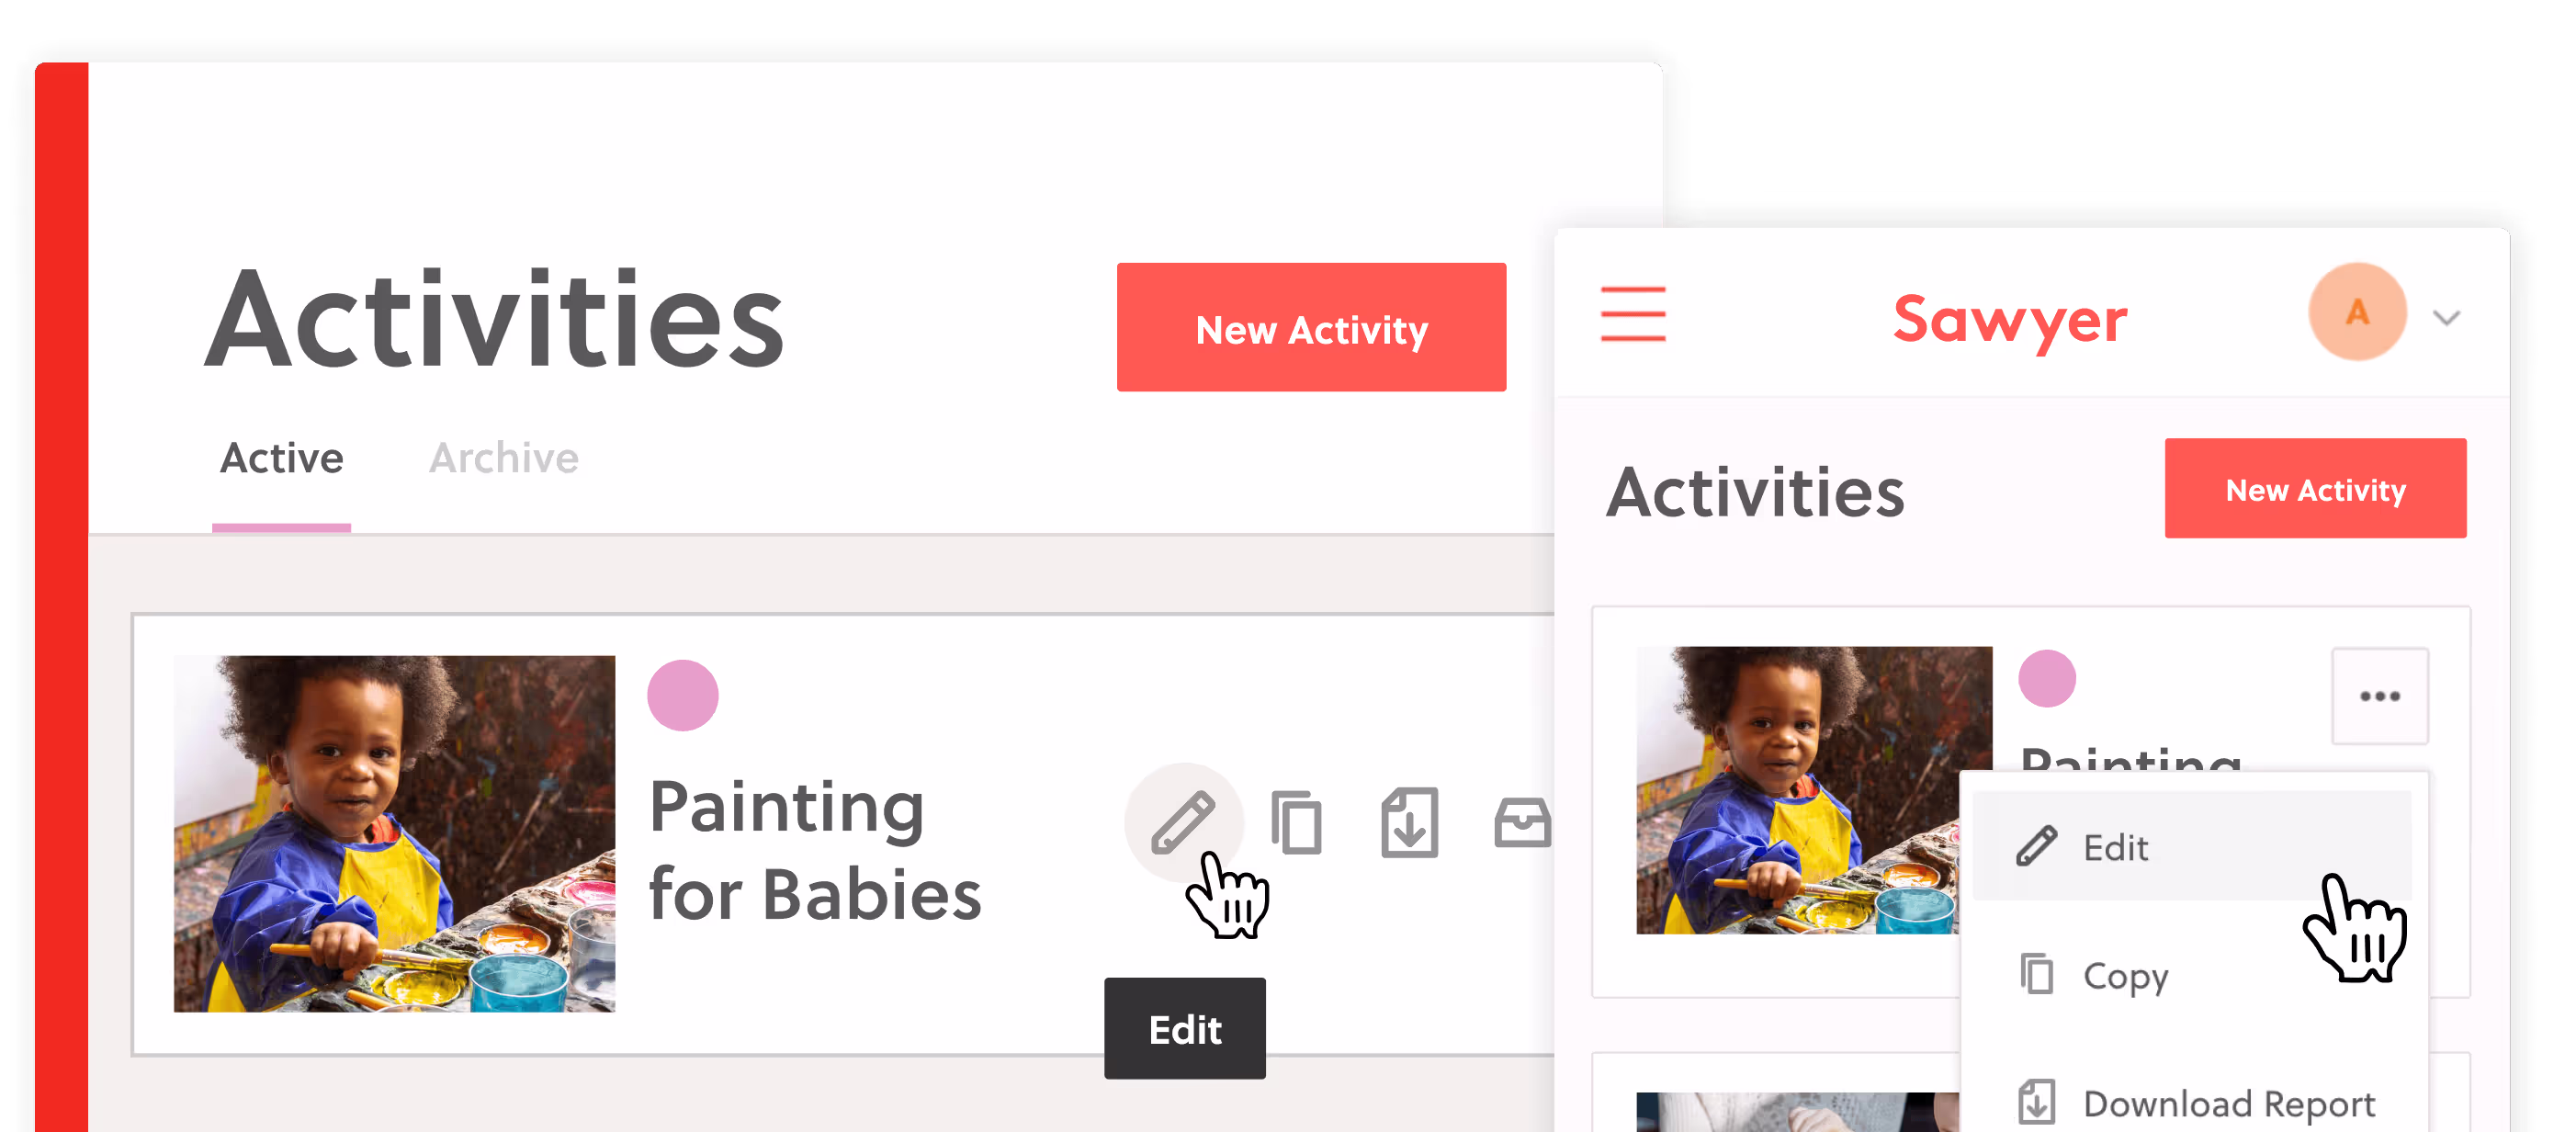
Listings
Listings are the building blocks of your programs so making edits will affect the corresponding scheduled activities.
- Basic activity details: Name, color, photo, any description, age range, in-person or online, and more!
- Form Fields: Profile Fields for the Launch plan, Custom Fields for Grow and Scale plans.
- Locations: This could be a physical location or online.
- Instructors: Email address and details including their bio.
- Cancellation Policies: This displays on the registration page and order confirmation email.
- E-Signature Agreements:* For Waivers, Photo and Medical Releases, and Code of Conduct forms.
Schedules
Schedules refers to specific scheduling types and controls what displays to customers as they register.
- Click on the schedule timeframe then select the Actions drop down to edit the timeframe name, dates and holidays.
- Use pencil icons for each scheduled activity to edit details like day of week, times, capacity, widget tags, pricing, add-ons and activity-specific sibling discounts.
- Once you start taking registrations for a program, you’ll need to move students before being able to make additional adjustments. Please review our Help Center article on updating a schedule that has bookings.
- If you are just looking to edit one day of the activity, you can edit the instance by going to the roster of that class day through the Upcoming tab then click the three dot icon in the upper right corner and select Edit Instance.
Financials
- Coupons: Please note that coupon codes cannot be edited. If you need to make a change to a coupon, deactivate the existing code then create a new one with the same code and the new parameters.
- Auto Discounts: You are able to edit Auto Discount parameters, but you may want to make a new one instead so that you can easily run reports on each variation.
Products
- Class Packs: If you change what activities a pack applies to, determine if you want the change to apply to packs that have been purchased by checking the corresponding option.
- Parties*: You can edit party details for each party type and edit details of party requests.
- Memberships*: Make sure to click on Plans to see your membership plans. Note that membership plans cannot be edited once they have a member, see more info here.
Settings
- Age Restricted Registration: Choose if you want to alert or block registrants who are outside of an activity's age range
- Order Confirmation Notes: Add your own message to the standard order confirmation email
- Custom Payment Methods: Control the custom payment methods you want to utilize, including ACH Bank Payments
- Integrations: Connect your Sawyer account to other apps like Mailchimp and Constant Contact
Widget Embeds
- Self Embed Widgets: Now you can create and edit widget codes for your website directly in your account!
* features marked with an asterisk are only available in Grow and Scale plans
Review our Help Center article for more support on making edits on Sawyer.
Launching your Sawyer registrations for the first time
Whether you’ve built out your programs yourself or we’ve built them out for you, let our Onboarding team know you’re ready to go live and we can help make sure it goes smoothly! Here are some options for how to open your registration:
Linking out from your site
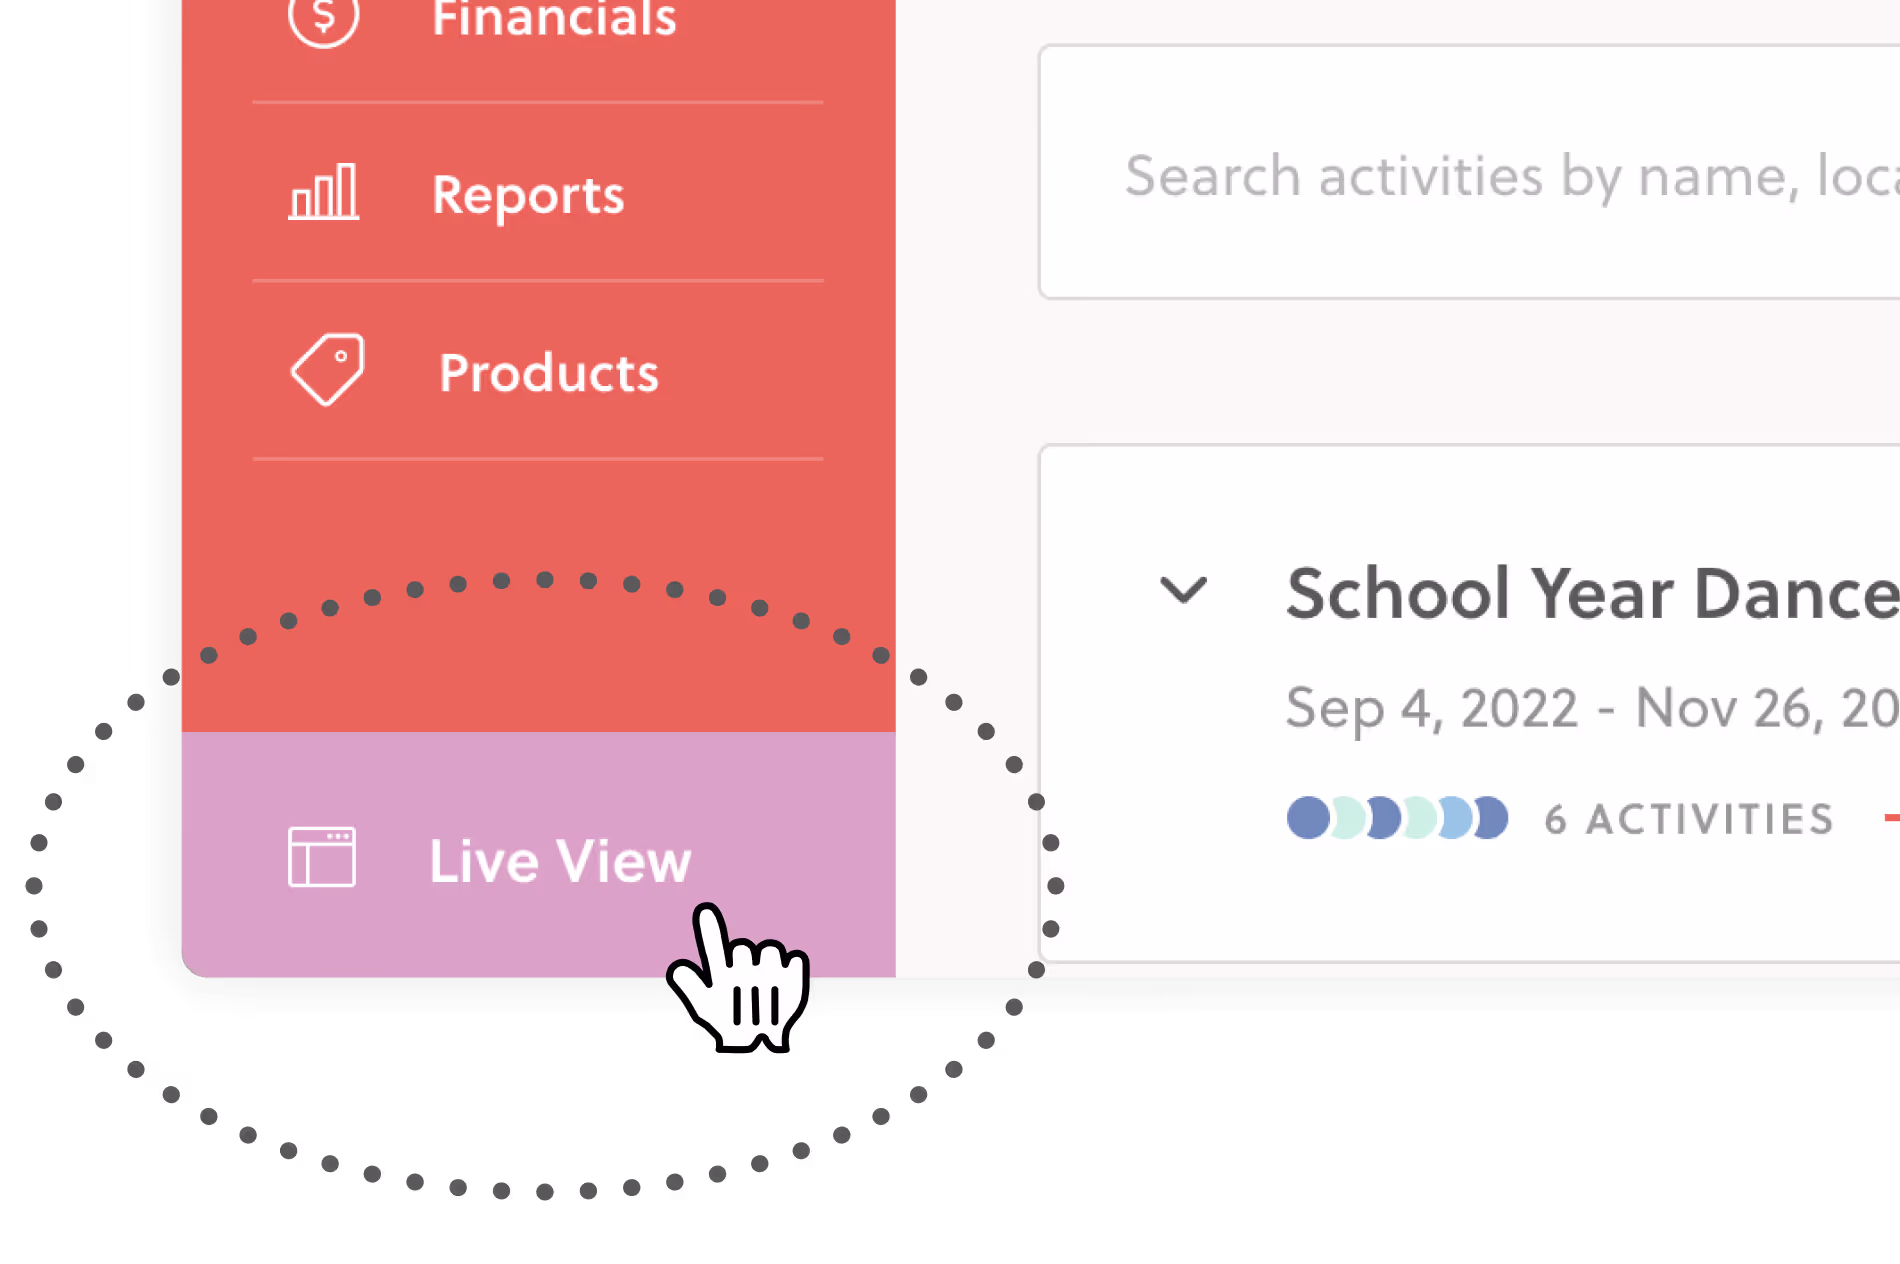
If you want to link out from your site to the hisawyer.com registration links, go to your Live View and collect the URLs of the pages you want to link and add them to your site! Any page that you get to from the Live View can be sent out to and used by customers.
Please note, you should not use any marketplace urls as these will be subject to marketplace fees. The url should always come from your Live View and not hisawyer.com/marketplace.
Embedding the Sawyer widget yourself
If you want to embed the Sawyer widget yourself, let our Onboarding team know and we’ll send you the html embed code(s) for your website. If you have a Wix or Google Site, you can actually use the URL from your Live View to embed the Sawyer widget! No need to get a code from us.
For information on how to embed a widget, please review our help article.
Having our team embed the Sawyer widget
If you want us to embed for you, let us know the URL of the page on your site and where on the page you want the widget added. Be sure to provide admin access to your website!
Keep in mind that programs built in Semesters, Camps/Events, and Appointments will have to be fully built with activity details and pricing, and the timeframe will have to be toggled to Published for them to show on your widget or Live View.
More information on the Sawyer widget or Live View can be found in this Help Center article.
Add ons
- Sawyer Website Builder ($15/month): Create a professional, branded website in minutes with Sawyer’s AI-powered website builder. This tool automatically syncs your programs and registration details, so everything stays up to date without any extra work.
Training videos
Looking for more support and step-by-step instructions? We've created training videos to teach you how to navigate Sawyer, understand the upcoming calendar, create activities, set up your schedule, and manage financials.
- Module 1: Welcome to Sawyer + Getting Started
- Module 2: First Steps to Schedule Creation
- Module 3: Get Ready to Schedule
- Module 4: Exploring the Customer Experience
- Module 5: Managing Your Business on Sawyer
- Module 6: Exploring Memberships on Sawyer
You can also find these links on our Help Center.
How to get support
Meet our Customer Success team
- Now that you are live and taking registrations with Sawyer, your main point of contact will be our Customer Success team! They are amazing and the go-to team for any and all support questions.
- You can reach support via email at support@hisawyer.com or by submitting a request. A member of the team will answer any support questions you may have during regular business hours (Monday-Friday 9:00am-5:00pm ET) or the next business day if sent after hours, on the weekend, or over a holiday.
Where to find answers
Getting started
- Before going live, the onboarding team is your point of contact. Email onboarding@hisawyer.com for help.
- For example:
- ~I haven't posted my registration yet and I have questions about getting set up.
- ~I just signed up for Sawyer and I have questions about scheduling, training, banking and/or posting registration.
Quick answers
- If you are looking for quick answers to small issues, the live chat and help center are the best places to go. To access the live chat, simply click on the blue help button located in the bottom right corner of your portal during active hours.
- ~What type of schedule should I build?
- ~Where can I find a report of all of my payouts?
Complex questions
- If you have more complicated questions, emailing our Customer Success team with all of the information can get you answers.
- For example:
- ~I’m having trouble understanding this report, can you help me make sense of it?
- ~Something’s not working the way it should, can you please troubleshoot with me?
Account management
- Scale providers can ask questions to their account manager via email.
- For example:
- ~How can Sawyer help me track and crush my growth goals this year?
- ~How can I optimize my Marketplace presence?
Tips & tricks for new Sawyer businesses
Making the most out of Sawyer
Once you start feeling comfortable navigating your Sawyer for Business account, you may be wondering how you get the most out of it! Here are some areas we recommend checking out:
Roster settings
- Form field responses for individual children can be displayed on rosters for easy access. A common form field response that businesses set to display on the roster is allergies.
Business account settings
- We recommend exploring your business account settings, especially if you are listed on our Marketplace as it contains content that you can set to show on your business profile, which can help parents learn more about your activities.
Our webinar series
- Our webinars cover a wide variety of topics - be sure to check out the ones that interest you and keep an eye out for future webinar invites.
Product updates
- We are always improving Sawyer! Sometimes our updates are big and sometimes they are small, but they are all beneficial to our providers. When we have something big to announce we are sure to shout it from the rooftops aka in your email inbox, but for ongoing product improvements, you can find details on our Product Updates page.
Sawyer blog
- We write lots of helpful, industry-specific blog posts aimed at growing a business in the children’s education space. Plus, we include tools and resources that can streamline running your business.
Stay connected
- Join our Facebook group to connect with other Sawyer providers and stay up to date.
Frequently Asked Questions
Here are the answers to some commonly asked questions.
How do I know when someone has signed up?
When a customer places an order, by default you will receive an email notification. To adjust those settings for you or any other users on your account, go to the Users & Permissions page, click the three dot icon next to the user, and click Edit Role. Then you can uncheck the box for the user to receive email communications.
To see orders directly in your account, simply click on the Financials tab on the menu bar in your account. This will show you a list of all orders placed. You’ll notice a Download Reports button in the upper right corner, which contains some reporting options.
For more information on accessing orders, see our Help Center article.
How do I access my roster and mark attendance?
As soon as customers start signing up for classes, you’ll see them populated in the rosters. To see rosters, simply click on the Upcoming tab in your account. There you will see a calendar with D, W, and M in the upper right corner, which correspond to daily, weekly, and monthly, accordingly. Click on these to adjust the calendar view so you can see your classes. Navigate to the class you are interested in, then click on it to see the roster. You’ll also see the attendance to the right of each participant’s name.
For more information on accessing your roster and marking attendance, see our Help Center article.
When do I get paid?
To see your pending payouts, go to Financials then Banking on the menu bar. By default you’ll receive payments on a weekly basis on Mondays, and payouts can take a few days to fully go through, depending on your bank. If you are on our Grow or Scale plan, you may have opted for an alternate payout schedule.
For more information on bank payouts, see our Help Center article.
How do I cancel orders/ transfer students?
To cancel an order and give a refund, navigate to the order, either through the client’s profile or the orders page, and click Cancel Order. For other actions you can take, refer to our Help Center article.
If you want to transfer a student, go to Upcoming and click into a roster. Click on the three dot menu next to the student and select the option titled Edit Enrollment. There you will choose the scheduled activity to transfer the student. For more details, review our Help Center article.
Once again, welcome to the Sawyer community! We can't wait to support you as you grow. You got this!

